 Home
About
Links
Happy New Year
Home
About
Links
Happy New Year
Posted: Wed, Jan 1 2014 at 4:24 pm by Emil Valkov
I’ve been playing a lot with Neopixels during the holidays. I made a bracelet, a pendant, and earrings for my wife, and also had a 4m 240 LED strip on display over my window. The NeoPixo library All of these projects share the same effects, just with slightly different parameters: the bracelet has 30 LEDs, […]
Posted: Wed, Jan 1 2014 at 4:17 pm by Emil Valkov
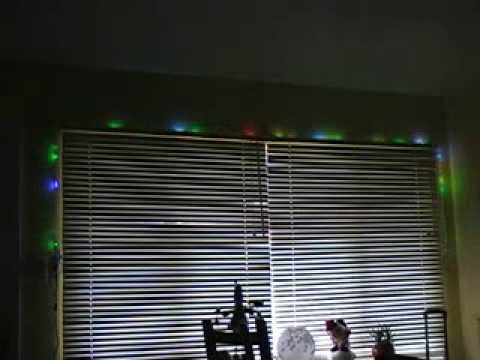 |
Neopixel strip animation I made for the New Year.
Uses an Arduino Mega to drive the Neopixels, and a Raspberry Pi for the countdown.
More details on my blog:
https://robidouille.wordpress.com/2014/01/01/happy-new-year/ |
From:
Robidouille
Views:
3
0
ratings |
| Time: 00:36 | More in Science & Technology |
Posted: Thu, Dec 26 2013 at 2:39 pm by Emil Valkov
I’ve been buying a lot of Adafruit Neopixels lately, and particularly a 4 meter long 240 LED strip which sits next to the Christmas tree. The setup is pretty standard, with an Arduino Mega setting up the various light patterns and movement. But now of course, you want to be able to control and program […]
Posted: Sun, Nov 17 2013 at 11:42 am by Emil Valkov
|
I built Hawi three years ago, and many of the component choices I made back then have better alternatives now. This article shows the upgrades I did, and also adds a more detailed description of the electronics I used. |
Posted: Sun, Nov 3 2013 at 8:47 pm by Emil Valkov
 |
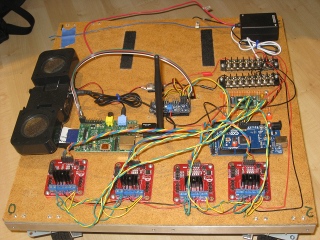
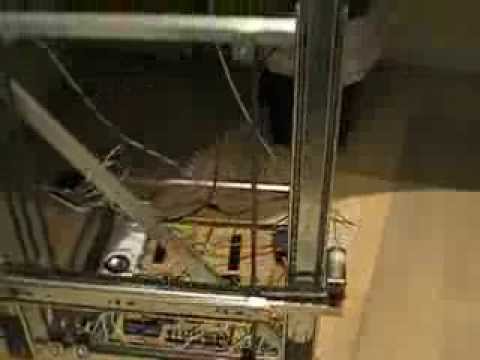
Last week I showed the chain driven system I added to Hawi, which could move up and down, as well as to left and right.
To try and make it useful, I've attached a dry-erase marker to it, with a longer term goal of making it draw something.
Until I get there though, I need a way to apply the marker to apply just the right amount of pressure on the dry-erase board (the desktop tower in video is just a stand-in for the dry-erase board for now)
The marker assembly consists of a spring and two switches. The two switches are not quite at the same level, on purpose, to detect the 3 possible cases:
-the two switches are off: not enough pressure. Move forward.
-only the first switch is on: pressure is just right. Stay there.
-the two switches are on: pressure is too much. Move away.
http://www.robidouille.com
https://www.google.com/+Robidouille |
From:
Robidouille
Views:
29
0
ratings |
| Time: 00:28 | More in Science & Technology |
Posted: Sun, Oct 27 2013 at 10:31 pm by Emil Valkov
 |
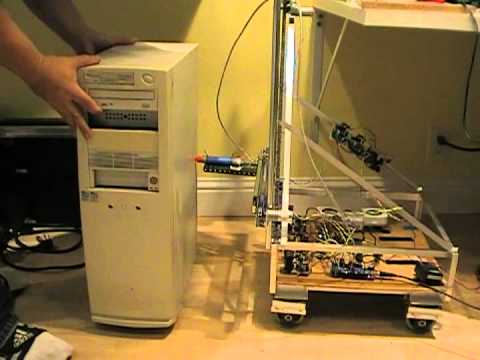
In this video I'm using back EMF to know when the rails reach their mechanical limits.
I took some drawer slides, and used them to create a cursor which can move left/right as well as up/down using 2 DC motors and a chain drive.
First the cursor moves left, then when it cannot go any further, it starts going up. Again when it cannot go any further to moves right, then down, and left again. And so on, indefinitely.
I didn't put any switches or buttons to detect the end of a run, it's all done using back EMF. It detects when the motor stalls essentially, and changes course.
It's all done using an Arduino micro-controller and L298 H-Bridges. Back-EMF circuitry is explained here: https://robidouille.wordpress.com/2009/09/20/back-emf/
I'm using my back EMF library to do this:
https://github.com/robidouille/robidouille/blob/master/Arduino/libraries/BackEmfMotor/BackEmfMotor.cpp
http://www.robidouille.com
https://www.google.com/+Robidouille |
From:
Robidouille
Views:
48
2
ratings |
| Time: 00:39 | More in Science & Technology |
Posted: Sat, Oct 19 2013 at 8:04 pm by Emil Valkov
I have OpenCV code using cvCreateCameraCapture and cvQueryFrame. Can I use it with the Raspberry Pi Camera? Well yes, read on to know how. – The Raspberry Pi Camera is widely available now, but there aren’t any open source video4linux (v4l) for it yet. Among other things, this makes it harder to use OpenCV with […]
Posted: Tue, Jun 1 2010 at 1:38 am by Emil Valkov
 |
http://www.robidouille.com
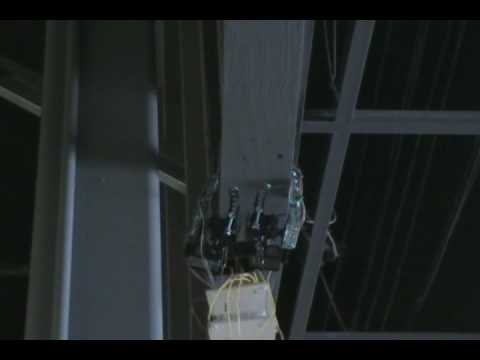
Danger Monkey is back.
Last time I showed Danger Monkey it was moving on my test setup.
You can see that video on my website or my youtube channel
This time I went to test it on-site at the office.
This wooden rail makes a circle around the office and is around 9 feet above the ground.
Needless to say, falling off the rail is not a good idea. |
From:
Robidouille
Views:
169
2
ratings |
| Time: 05:37 | More in Science & Technology |
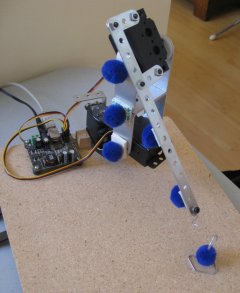
Posted: Sat, May 29 2010 at 2:30 am by Emil Valkov
 |
http://www.robidouille.com
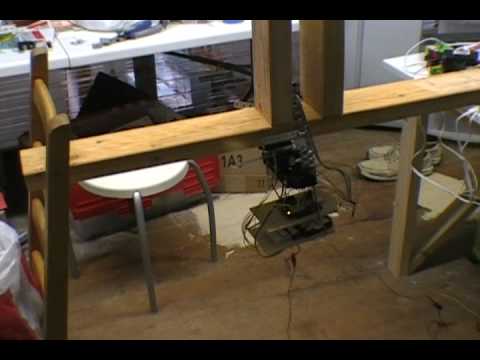
This new robot is called Danger Monkey.
Its goal is to be able move on a horizontal wooden 2 by 4 stud.
To complicate things a little however there are obstacles as you can see,
and they that need to be avoided.
I've tried several designs, some with wheels, and others with arms.
My 2 arm version is working best so far.
I'm using an Arduino as microcontroller. The servos are cheap Hitec HS322-HD.
Each arm has 2 lever-switches to detect pressure in front and below.
This actually comes from a challenge at the office, where we have a much bigger version of this
that goes around the ceiling of our building.
Next step is to see if it works there. |
From:
Robidouille
Views:
472
1
ratings |
| Time: 01:10 | More in Science & Technology |
Posted: Tue, Apr 27 2010 at 1:06 am by Emil Valkov
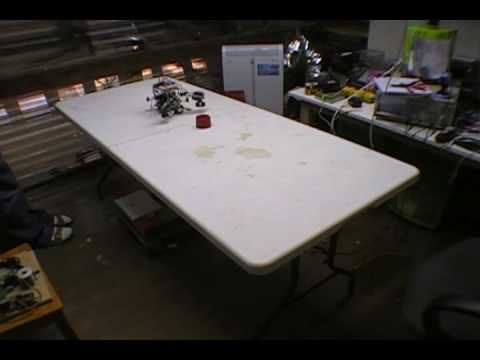
Jodi got a silver medal at robogames ! Hurray !
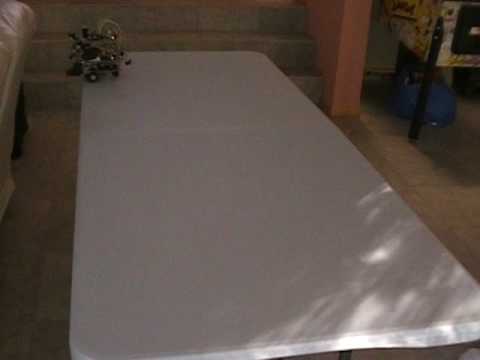
Posted: Sun, Apr 18 2010 at 11:01 pm by Emil Valkov
 |
http://www.robidouille.com
The goal of phase 2 is to have Jodi find the target and push it off the table without itself
falling off. |
From:
Robidouille
Views:
72
0
ratings |
| Time: 01:25 | More in Science & Technology |
Posted: Mon, Mar 29 2010 at 9:41 pm by Emil Valkov
After being entirely remote controlled, Hawi makes its first steps (or rather wheel turns) on its own. I did lot of software upgrades to achieve this, some of which are not necessary right now, but will hopefully pay in the future.
Posted: Sun, Mar 28 2010 at 8:02 pm by Emil Valkov
 |
http://www.robidouille.com
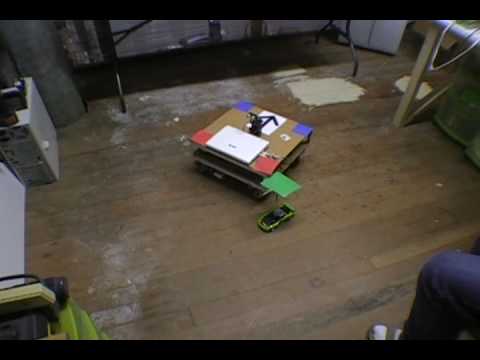
Hawi uses sterovision to move autonomously and track an RC car |
From:
Robidouille
Views:
169
1
ratings |
| Time: 01:32 | More in Science & Technology |
Posted: Sat, Nov 21 2009 at 1:19 pm by Emil Valkov
After making good progress on my robot arm, it became obvious that to be useful the arm could not remain confined to a table. Instead it had to be mobile. So the next logical step is to build a platform that would be able to move around and eventually have an arm (or maybe even […]
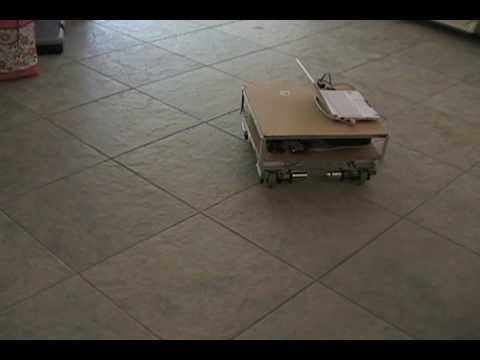
Posted: Sun, Oct 25 2009 at 9:50 pm by Emil Valkov
 |
http://www.robidouille.com
Jodi is my first attempt at the HBRC Challenge.
For Phase1 it has to stay on the table.
As you can notice it has more sensors than necessary for this. They are meant to be used for Phases 2 and 3. |
From:
Robidouille
Views:
335
0
ratings |
| Time: 01:23 | More in Science & Technology |
Posted: Sun, Oct 18 2009 at 2:39 pm by Emil Valkov
 |
http://www.robidouille.com
Hawi has 4 motorized wheels. Each wheel has it's own DC motor and a servo that controls it's orientation.
So it can turn like a car.
But also turn all it's wheels and move sideways.
Planetary gearboxes on the motors allow for high torque and precise control, in spite of it's weight.
And finally setting the wheels at 45 degrees allows Hawi to spin.
Hawi is remote controlled for now, but the goal is to make it autonomous as soon as possible. |
From:
Robidouille
Views:
653
0
ratings |
| Time: 00:57 | More in Science & Technology |
Posted: Sun, Sep 20 2009 at 1:28 pm by Emil Valkov
As promised, here are some more details on how I implemented back-emf to control the wheel’s rotational speed. First, what is back-emf exactly? When you apply voltage to a DC motor, it turns. But also when the DC motor is turning, voltage appears on its pins, like a dynamo. This voltage is the back-emf I’m […]
Posted: Sun, Sep 6 2009 at 12:35 pm by Emil Valkov
After working on my robot arm, it became obvious I needed to attach it to a mobile platform that would be able to move around and do things. So I decided to build my own platform. Why not take an existing platform? Well for one, it takes half the fun away! But also it allows […]
Posted: Sun, Aug 30 2009 at 9:21 pm by Emil Valkov
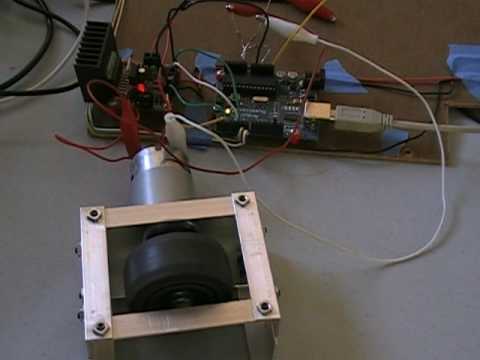 |
I'm using back emf to regulate a DC motor's speed.
The project uses an arduino and an L298 H-bridge to control the motor.
http://www.robidouille.com |
From:
Robidouille
Views:
931
2
ratings |
| Time: 00:48 | More in Science & Technology |
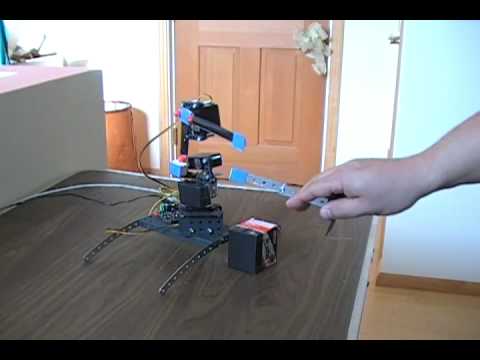
Posted: Sun, Aug 23 2009 at 7:27 pm by Emil Valkov
|
In this phase the Arm is no longer content to merely point at its target. It tracks it, picks it up, and sets it down close by. To achieve this, the software has been upgraded to support sequences of actions. |
Posted: Sun, Aug 16 2009 at 10:32 pm by Emil Valkov
 |
In phase 4, the arm finds the object, and brings it back home using stereovision, and adapting to changing conditions in real time.
http://www.robidouille.com |
From:
Robidouille
Views:
1084
3
ratings |
| Time: 01:58 | More in Science & Technology |
Posted: Sun, Aug 9 2009 at 5:51 pm by Emil Valkov
Two industrial robots are now employed as noodle chefs in Nagoya, Japan.
Posted: Fri, Jul 31 2009 at 3:09 am by Emil Valkov
Look out Ichiro Suzuki and Daisuke Matsuzaka. ..
Posted: Sun, Jul 12 2009 at 3:09 pm by Emil Valkov
 |
In phase 3 I added extra blue points, which allow for stable tracking as the initialization step I used before is no longer needed.
http://www.robidouille.com |
From:
Robidouille
Views:
788
4
ratings |
| Time: 01:18 | More in Science & Technology |
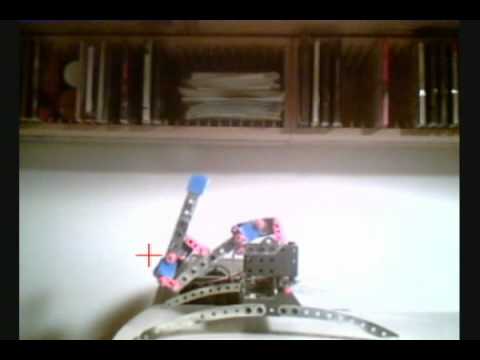
Posted: Sun, Jul 12 2009 at 3:06 pm by Emil Valkov
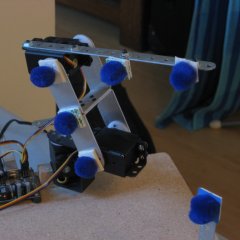
|
The main problem in the last version was keeping track of my blue points. The initialization code I had in phases 1 and 2 is no longer needed now. Instead I added 2 extra blue points. This gives me more information about the structure of the arm, and allows me to identify the points using only a single frame. |
Posted: Wed, Dec 31 2008 at 7:52 pm by Emil Valkov
 |
In phase 2, I added a 3rd degree of freedom, and use stereo vision with 2 cameras to compute coordinates.
http://www.robidouille.com |
From:
Robidouille
Views:
545
3
ratings |
| Time: 02:45 | More in Science & Technology |
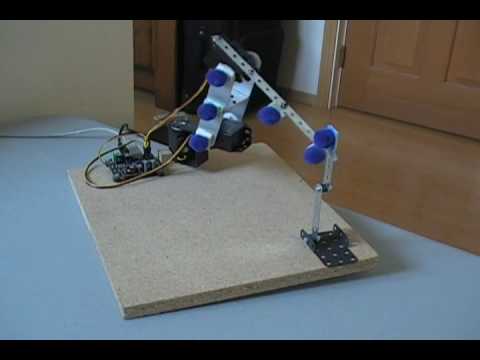
Posted: Wed, Dec 31 2008 at 5:09 pm by Emil Valkov
This is an evolution of my initial robot arm. I added an extra servo at the base, thus bumping up the degrees of freedom to 3. This introduces a new challenge as the arm moves in 3D now. To obtain 3D coordinates, I use 2 cameras and triangulate the 2D coordinates into 3D coordinates.
Posted: Mon, Dec 15 2008 at 5:41 pm by Emil Valkov
Here is a more detailed look at the algorithm used and math involved in creating my robot arm. |
Posted: Tue, Dec 9 2008 at 6:15 pm by Emil Valkov
 |
http://www.robidouille.com |
From:
Robidouille
Views:
225
2
ratings |
| Time: 00:07 | More in Science & Technology |
Posted: Tue, Dec 9 2008 at 6:12 pm by Emil Valkov
 |
http://www.robidouille.com |
From:
Robidouille
Views:
218
2
ratings |
| Time: 00:17 | More in Science & Technology |
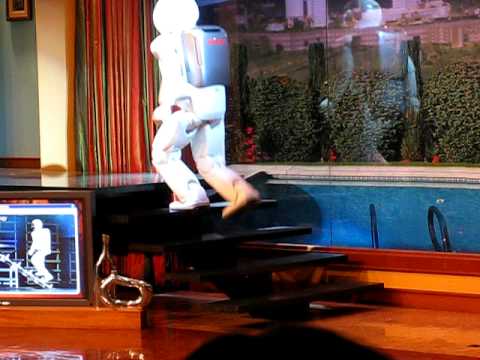
Posted: Tue, Dec 9 2008 at 6:04 pm by Emil Valkov
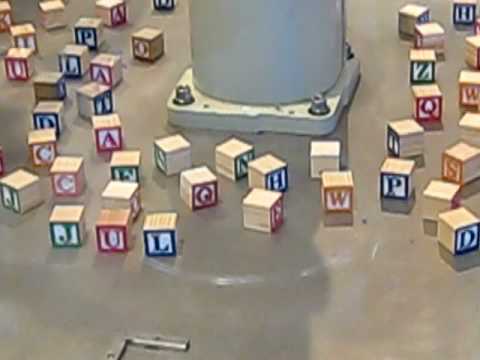 |
http://www.robidouille.com
A Robot arm in the San Jose Tech Museum that can grab and put back letters, forming any word |
From:
Robidouille
Views:
2081
3
ratings |
| Time: 00:17 | More in Science & Technology |
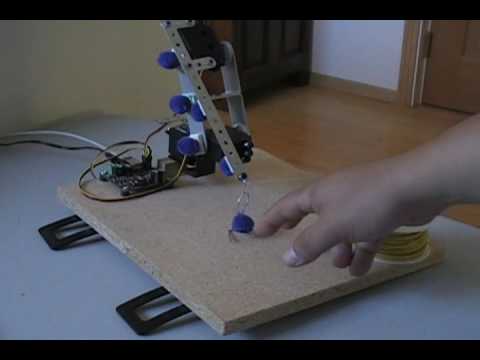
Posted: Sat, Dec 6 2008 at 7:41 pm by Emil Valkov
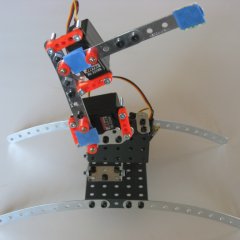
|
This robot arm is very simplistic, is uses only 2 servos, one for the “shoulder” and one for the “elbow”. Its main purpose is to experiment with ways to control it. |
Posted: Fri, Dec 5 2008 at 11:58 pm by Emil Valkov
 |
Very simple arm with 2 degrees of freedom, that tracks a target using a camera, and adapting to changing conditions in real time.
http://www.robidouille.com |
From:
Robidouille
Views:
595
2
ratings |
| Time: 01:33 | More in Science & Technology |
